I love Obsidian and am ever so grateful for the Obsidian community’s contributions to make a great software even greater.
While I was learning how to use Notebook Navigator, a fantastic community plug-in by Johan Sanneblad, I took notes.
I’m actually a technical writer by trade. So, I thought it would be a great idea to share a simple Notebook Navigator users’ guide for users who want a quick and easy way to get started with the plug-in.
This document is a work-in-progress. However, what’s available will quickly help you get started with Notebook Navigator.
PS: I’m open to suggestions for improvement (do leave a comment below).
Table of contents
- Notebook Navigator: Overview
- Quick start guide
- Notebook Navigator: The User Guides
- Getting to know Notebook Navigator’s toolbar buttons
- Switching from “list” to “card” view
- How to pin your favourite notes
- How to add a shortcut to your notes or folders
- Using Tags and Folders
- Changing icons and colour-coding your folders and notes
- How to manually sort your notes
- Searching inside a specific folder
- FAQ
Notebook Navigator: Overview
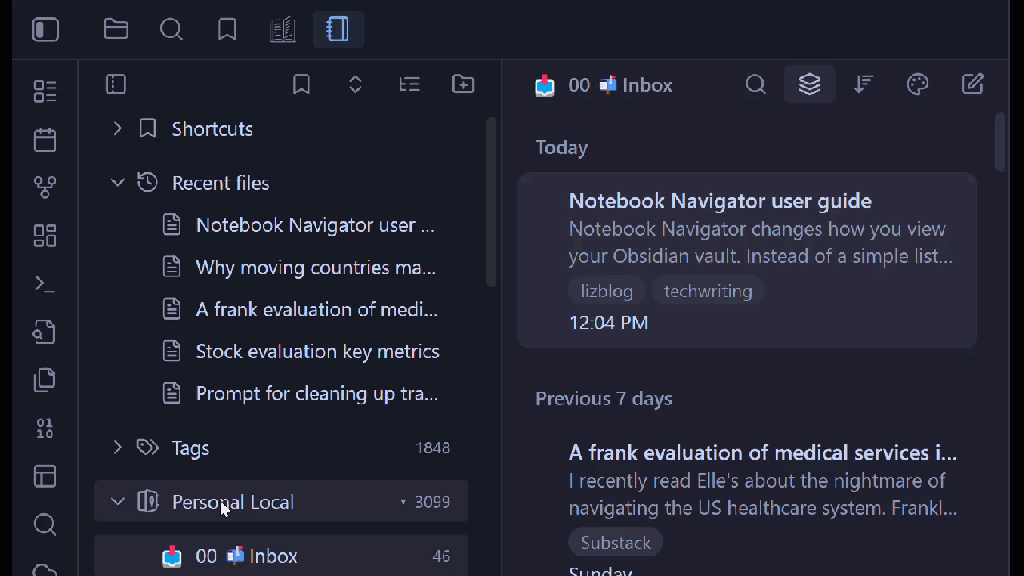
Notebook Navigator changes how you view your Obsidian vault. Instead of a simple list of folders and file, it gives you a visual, two-pane interface similar to apps like Apple Notes or Evernote.
Why use it?
- Visual browsing: See the first few lines of your notes (and even images) before you open them. This makes finding the right note easier than just reading filenames.
- Better organization: Navigate using Folders OR Tags side-by-side. You can colour-code your folders and add icons to make them stand out.
How Notebook Navigator improves on the standard Obsidian file view:
- Pin any note, folder, or tag to the top of the list for instant access.
- Preview the first few lines of text for each note, so you know what is inside without opening it.
- Display images on your note cards, turning your list into a visual gallery.
- Folders and Tags are brought together in one sidebar for ease of navigation.
- Search inside a specific folder.
- Colour-code and assign custom icons to notes to make them stand out visually.
- Drag and drop a note in the order you want.
Quick start guide
Follow these steps to get Notebook Navigator running in under 5 minutes.
1. Installing Notebook Navigator
- Open Obsidian settings > Community Plugins. Turn off “Restricted Mode” if it is on. (See Toolbar buttons guide for more information.)
- Click Browse and search for “Notebook Navigator”.
- Click Install and then Enable.
2. Activating the Navigator
Once enabled, you will see a new “Notebook” icon in your left ribbon sidebar.
- Click the icon to open the Notebook Navigator view.
- It will replace your standard file explorer with the new two-pane view.
Tip: If you don’t see the two-pane view, widen the left sidebar.
Basic setup tips
- Adjust the view: You can drag the divider line between the folders and the note list to see more text.
- Pin important items: Right-click any important folder or tag and select Pin. This keeps it at the top of your list for quick access.
- Keyboard navigation: You don’t need a mouse. Use your Arrow Keys to move up and down. Press Tab to switch between the folder list and the note list.
Next steps:
- Get to know Notebook Navigator’s toolbar buttons.
- Read the User Guides to really master the key features of Notebook Navigator.
- Read the FAQs to get your answers to commonly asked questions.
Notebook Navigator: The User Guides
The following guides will help you understand how to use Notebook Navigator’s features.
Getting to know Notebook Navigator’s toolbar buttons
ℹ️ You can choose which buttons will appear on the toolbar. Go to Obsidian’s Settings and scroll down to the Community plug-ins section. Then, click Notebook Navigator > General and scroll down to Toolbar buttons. Just click on the icons to select or deselect the icons.

The Navigation Pane menu
This is the narrow column on the far left where you pick where to look.
- Notebook Navigator button (📒) – By clicking on this you activate the panes.
- Show single pane – Switch to single pane view.
- Shortcuts (⛉): Add the notes you want to access quickly here.
- Collapse items – Minimise file tree
- Reorder root folders and tags (Three Horizontal Lines): Rearrange your items by dragging and dropping them to the order you desire.
- New folder – Add new folder
- Recent files (Clock Icon): This shows a list of the notes you opened most recently. It is great for jumping back into work you were doing yesterday.
- Tags: Navigate via the tags in your vault.
List Pane menu
This pane will show you more information on the items you’ve selected on the navigator menu. You can do the following in the list pane:
- Search (🔍): This searches only the folder or tag you are currently looking at. It does not search your whole computer. Use this to find a specific file quickly within a folder.
- Show notes from subfolders/descendants:
- If ON: You see notes in the current folder plus notes inside any folders underneath it.
- If OFF: You only see notes that are directly inside the current folder. Change sort order: Reorder the list pane results according to your preferences.
- Change sort order: Sort from date created, date edited, title and more.
- Change appearance: Switch between card view and list view.
- Create new note
The right-click menu
When you right-click on a note/file, folder, or tag, you get a special menu.
(ℹ️To select a note, you need to click on the folder in the navigation pane, then right click on the note on the list pane.)
Here are the most useful options:
- Pin note: Pins the note so that it’ll be at the top of the list pane when the folder it’s in is selected.
- Add to shortcuts: Add the note to shortcuts.
- Change color: Lets you highlight a folder name with a specific color (like Red for urgent or Green for personal).
- Change icon: Lets you replace the standard folder icon with an emoji or symbol (like a house icon for your “Home” folder).
Switching from “list” to “card” view
⚠️ Pre-requisites: If you want to see images on these cards, install the “Featured Image” plugin from the Obsidian community store.
By default, files can be viewed as cards. Here is how to change them into a list.
- On the second pane, click on the paint palette icon.
- Click Slim.
- To change back to the card view, click on the paint palette icon (🎨) > Default.
You can select the card or “slim” list view as the default view in Notebook Navigator’s settings.
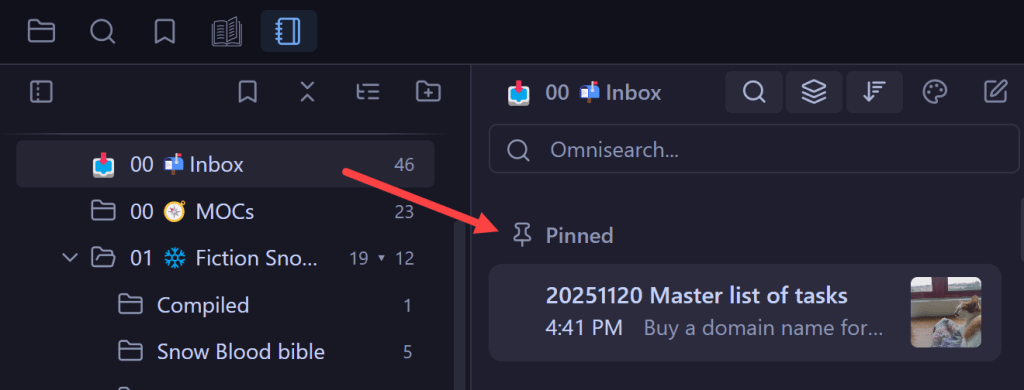
How to pin your favourite notes
Stop searching for the same note over and over again. Pin it to the top of the list pane each time you click on the folder.
ℹ️ You can pin more than one note.
- Right click at the note.
- Select Pin note.
- Look at the very top of the second pane on the left. You will see a pin icon. Your pinned items are below it.
The pinned note appears at the folder level. Let’s say the note belongs to a folder called “Inbox”. To see the pinned note, click on the Inbox folder at the navigation pane. The pinned note will appear on the list pane on the right.
How to add a shortcut to your notes or folders
- Right click at the note or folder.
- Select Add to shortcuts.
- Your notes or folder will now be below the Shortcuts icon on the navigator pane for quick access.
Using Tags and Folders
Notebook Navigator puts your Folders and Tags in the same menu. This helps you organize notes quickly.
To Browse: Click a folder to see files by location. Click a Tag to see files by tags.
To tag a note
- Click and hold a note card from the right side.
- Drag the note over to a Tag in the left sidebar.
- Drop it.
The note now has that tag added to it automatically!
Alternatively, just select the note and click on the tag icon or right click and select Add tag.
Changing icons and colour-coding your folders and notes
Make your important folders stand out instantly with colours and icons.
- Right-click on any Folder, Note or Tag in the left sidebar.
- To change color: Select Change Color. Pick a color (like Red for “Urgent”).
- To change icon: Select Change Icon. Type a word like “Home” or “Work” to find a matching symbol.
How to manually sort your notes
Sometimes you don’t want notes or folders sorted by date. You want them in a specific order.
- Click the Reorder icon at the top of the navigator pane.
- Click and hold any note or folder.
- Drag it up or down to place it exactly where you want it.
Searching inside a specific folder
⚠️ Pre-requisite: Installed the “Omnisearch” plug-in.
If you type in the main Obsidian search bar, you get results from everywhere. Here is how to search just one area.
- Click the Folder or Tag you want to search (e.g., “Recipes”).
- On the list pane, click the magnifying glass icon.
- Type your search query (e.g., “Chicken”).
- The list will only show notes inside the folder that matches your query.
FAQ
What are the recommended community plug-ins to extend Notebook Navigator’s features?
Notebook Navigator works great on its own, but these three additional plugins make it even better. Installing them is optional but recommended.
Tip: If you’re unsure how to install community plug-ins, please read Obsidian’s documentation on community plug-ins.
Style Settings
- What it does: Allows you to change the look of Notebook Navigator without writing code.
- Why you need it: You can change font sizes, background colors, and hide elements you don’t use to make the interface cleaner.
Featured Image
- What it does: Automatically finds the first image inside your note and creates a small thumbnail cover.
- Why you need it: It turns your note list into a visual gallery.
Omnisearch
- What it does: A powerful search engine for your notes.
- Why you need it: Notebook Navigator connects to this plugin to let you search the contents of your notes (not just the titles) directly from the navigator bar.
Why aren’t images showing up on my cards?
- Ensure you have the Featured Image plugin installed and enabled.
- Check that your note actually contains an image.
How do I customize Notebook Navigator?
Go to Obsidian’s settings > Notebook Navigator. There, you have the option to customize:
- Navigation pane
- List pane
- Menu buttons
- Folders & tags
- Notes
- Set hotkeys and search options
How do I add images to my note cards in the list pane?
If your note cards look plain, you can add cover images automatically.
⚠️ Pre-requisite: Installed the Featured Image community plugin.
- Go to Obsidian’s Settings > Notebook Navigator > Notes
- Turn on “Show Feature Image”.
Now, the first image inside any note will automatically appear as a thumbnail on its card in the list.

Leave a Reply